Quantcast
Channel: lefred blog: tribulations of a MySQL Evangelist
Viewing all 411 articles
Browse latest View live

About MySQL and Indexes

$
0
0

MySQL supports different types of Indexes. They depend on the storage engine and on the type of data. This is the list of supported indexes:

Best Practices

My recommendation are valid for InnoDB storage engine. I won’t talk about MyISAM. There are some best practices to follow when designing your tables. These are the 3 most important:

  1. use a good Primary Key
  2. don’t include the Primary Key as the right most column of the index, it’s always there anyway (hidden)
  3. remove not used indexes

InnoDB and a good Primary Key

Primary Key selection in InnoDB is very important. Indeed, InnoDB tablew storage is organized based on the values of the primary key columns, to speed up queries and sorts involving the primary key columns. For best performance, choose the primary key columns carefully based on the most performance-critical queries. Because modifying the columns of the clustered index is an expensive operation, choose primary columns that are rarely or never updated.  

Also it’s very important to avoid “rebalancing” the cluster index at each write. This is why a sequential value is recommended as Primary Key.

Let’s compare a table using a sequential Primary Key (integer auto_increment) and a table using a completely random Primary Key. We will check how many pages are touched. To do so we check the LSN (bigger number are latest touched page):
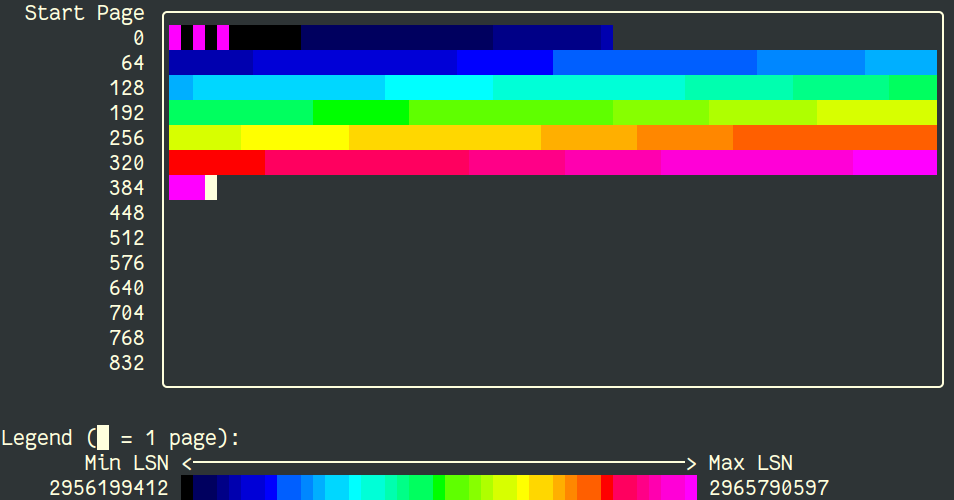
id int auto_increment primary key

We can see that new records are added at the end of the table space.

Now let’s see what happens in the opposite case:

pk varchar(255) NOT NULL primary key

It’s obvious that every time a new record is inserted, InnoDB has to place it in order and must move all the pages to have it sorted. This is the “clustered index rebalancing” that you should avoid at any cost ! Imagine the effect of that on a table of serveral hundreds of Gigabytes !!

Additionally, it’s also important to not have the Primary Key included in any secondary index as the right most column.

Secondary indexes (if the returned value is not part of it) are used to lookup the matching values using the index and then retrieve the full record through a second lookup using the clustered index. So 2 lookups are required when using secondary indexes if data not included in the index is required.

To perform such second lookup, every secondary index contains already the value of the primary key. The value is hidden.

This means that if you have a table like this:

+----------+-------------+------+-----+-------------------+-------------------+
| Field    | Type        | Null | Key | Default           | Extra             |
+----------+-------------+------+-----+-------------------+-------------------+
| id       | int(11)     | NO   | PRI | NULL              | auto_increment    |
| name     | varchar(20) | YES  |     | NULL              |                   |
| inserted | timestamp   | YES  |     | CURRENT_TIMESTAMP | DEFAULT_GENERATED |
+----------+-------------+------+-----+-------------------+-------------------+

Let’s imagine you would like to create an index including name and id, the definition would be:

alter table secondary add index new_idx(name, id);

But in reality the index will be new_idx(name, id, id)

A correct index definition would be then to have just new_idx(name).

Now that you know Primay Keys are always included “for free” to any secondary index, you can imagine the consequence of having a PK on a varchar(255) in utf8 ! Such Primary Key will add 1022 bytes to every secondary index entries you would create !

And what about no Primary Key ?

Would it be better to have no Primary Key then ?

The usual answer by every DBA is “it depends !”

Usually I would recommend to always define a Primary Key.

Now if you have only one single table in MySQL that doesn’t have Primary Key and that you don’t intend to use Group Replication (it’s mandatory to have a Primary Key defined for every table to allow certification!), it might be better for performance to have no primary key then a bad one !

However, you should not have multiple tables without Primary Keys or you may encounter scalability issues.

If you don’t define a Primary Key, InnoDB will use the first non NULL unique key as Primary Key. If your table doesn’t have any unique key not NULL, then InnoDB will generate a sequential hidden Primary Key stored on 6 bytes. This hidden clustered index is calledGEN_CLUST_INDEX . But this Primary Key incremented value is shared by all InnoDB tables without Primary Key !

This means if you have 10 tables without Primary Key, if you do concurrent writes on each of them, you will have to wait for mutex contention on that counter.

Stay tuned for the next article on MySQL and Indexes.

Some queries related to MySQL Roles

$
0
0

MySQL Roles are becoming more and more popular. Therefor, we receive more and more questions related to them.

First I encourage you to read this previous 2 posts:

In this post, I will share you some queries I find useful when using MySQL Roles.
Listing the Roles

The first query allows you to list the Roles created on your MySQL Server and if they are assigned to users, and how many:

SELECT any_value(User) 'Role Name', 
       IF(any_value(from_user) is NULL,'No', 'Yes') Active,
       count(to_user) 'Assigned #times'        
FROM mysql.user 
LEFT JOIN mysql.role_edges ON from_user=user
WHERE account_locked='Y' AND password_expired='Y' 
AND authentication_string='' GROUP BY(user);

And this is the output:

+------------------+--------+-----------------+
| Role Name        | Active | Assigned #times |
+------------------+--------+-----------------+
| dbt3_reader      | Yes    |               2 |
| dbt3_update      | Yes    |               1 |
| dbt3_writer      | Yes    |               1 |
| dbt3_full_reader | No     |               0 |
+------------------+--------+-----------------+

Listing the active Roles with the users

The following query list all active Roles with the list of users they are assigned to:

SELECT from_user Roles, GROUP_CONCAT(to_user SEPARATOR ', ') Users
FROM mysql.role_edges GROUP BY from_user;

That will returns something similar to this:

+-------------+------------------------+
| Roles       | Users                  |
+-------------+------------------------+
| dbt3_reader | dbt3_user1, dbt3_user2 |
| dbt3_update | dbt3_user1             |
| dbt3_writer | dbt3_user3             |
+-------------+------------------------+

Listing all users assigned to one or multiple Roles

And finally, this query list all users having at least a Role assigned to them. Each users have the list of Roles they have assigned:

SELECT to_user Users, GROUP_CONCAT(from_user SEPARATOR ', ') Roles
FROM mysql.role_edges GROUP BY to_user;

The above query will return something like:

+------------+--------------------------+
| User       | Roles                    |
+------------+--------------------------+
| dbt3_user1 | dbt3_reader, dbt3_update |
| dbt3_user2 | dbt3_reader              |
| dbt3_user3 | dbt3_writer              |
+------------+--------------------------+

I hope you will find those queries useful and that you enjoy the MySQL Roles in MySQL 8.0

MySQL InnoDB Cluster from scratch – even more easy since 8.0.17

$
0
0

Create a MySQL InnoDB Cluster using MySQL 8.0 has always been very easy. Certainly thanks to MySQL Shell and server enhancements like SET PERSIST and RESTART statement (see this post).

The most complicated part to deal with was the existing and none existing data. In fact GTID sets must be compatible.

Let me explain that with some examples:

Example 1 – empty servers

If you have empty servers with GTID enabled, manually creating credentials to connect to each MySQL instances will generate GTIDs that will prevent nodes to join the cluster. Before 8.0.17 if you were doing this, you had to explicitly avoid to write the users in binary log.

Example 2 – servers with data but purged binary logs

When you want to add a new servers to a cluster, before 8.0.17 when the new server (joiner) wants to join the cluster, this is a very high summary of what they say:

- joiner: hello I don't have any GTID
- group: ok we are now at trx (gtid sequence) 1000, 
         you will then need from 1 to 1000, let's see 
         if somebody part of the group as those trx
- member1: no, I don't, I've purged my inital binlogs, I've from 500
- member2: no, I don't, the first binlog I've starts with gtid 600
- joiner: damn ! I can't join then, bye ! 

And this is the same when you prepare a new member with a backup, you need to be sure that next gtid since the backup was made is still available at least in one of the members.

My colleague Ivan blogged about that too.

Clone Plugin

Since MySQL 8.0.17, all this is not necessary anymore, the clone plugin can handle the provisioning automatically. If we take the second example above, instead of saying bye , the joiner will copy all the data (clone) from another member directly, without calling an external shell script or program, but directly in the server using the clone plugin !

10 minutes to install MySQL and setup an InnoDB Cluster

Let’s see this in action:

Since MySQL InnoDB Cluster is out, we received a lot of very good feedback, but the main feature request was always the same: automatic provisioning ! This is now part of the reality ! Wooohoooo \o/

And of course it’s all integrated directly into MySQL.

MySQL Router 8.0.17 and the REST API

$
0
0

Since MySQL 8.0.16, the Router as the possibility to launch an internal webserver (see Jan’s blog post).

Even if this webserver could serve static files, it was the first piece of a much more interesting solution that is now available since 8.0.17.

It’s possible now to query the MySQL Router via its REST API and get a lot of useful information.

Setup

Let’s first configure our MySQL Router to take advantages of this new feature. In this example, I will add the following lines to /etc/mysqlrouter/mysqlrouter.conf that I created using the --bootsrapcommand line argument:

[http_server]
port=8080

[rest_api]

[rest_router]
require_realm=somerealm

[rest_routing]
require_realm=somerealm

[rest_metadata_cache]
require_realm=somerealm

[http_auth_realm:somerealm]
backend=somebackend
method=basic
name=Some Realm

[http_auth_backend:somebackend]
backend=file
filename=/etc/mysqlrouter/mysqlrouter.pwd

Now, I will create the required credentials:

# mysqlrouter_passwd set /etc/mysqlrouter/mysqlrouter.pwd fred

I can of course verify it:

# mysqlrouter_passwd verify /etc/mysqlrouter/mysqlrouter.pwd fred
Please enter password:

And finally, I must change the ownership of my new password file:

# chown mysqlrouter /etc/mysqlrouter/mysqlrouter.pwd

It’s time to restart MySQL Router.

Using the REST API

Now that the MySQL Router is running and it has been configure, what can we do with it ?

For example, if we want to know which server will be reached for RW, we can use the following command:

$ curl -s -u fred:fred \
  http://192.168.91.2:8080/api/20190715/routes/myCluster_default_rw/destinations
{"items":[{"address":"mysql2","port":3306}]}

It’s also possible to list all the possible calls that can be performed using /api/20190715/swagger.json:

$ curl -s -u fred:fred http://192.168.91.2:8080/api/20190715/swagger.json | jq '.paths'
{
   "/metadata/{metadataName}/config": {
     "get": {
       "tags": [
         "cluster"
       ],
       "description": "Get config of the metadata cache of a replicaset of a cluster",
       "responses": {
         "200": {
           "description": "config of metadata cache",
           "schema": {
             "$ref": "#/definitions/MetadataConfig"
           }
         },
         "404": {
           "description": "cache not found"
         }
       }
     },
     "parameters": [
       {
         "$ref": "#/parameters/metadataNameParam"
       }
     ]
   },
   "/metadata/{metadataName}/status": {
     "get": {
       "tags": [
         "cluster"
       ],
       "description": "Get status of the metadata cache of a replicaset of a cluster",
       "responses": {
         "200": {
           "description": "status of metadata cache",
           "schema": {
             "$ref": "#/definitions/MetadataStatus"
           }
         },
         "404": {
           "description": "cache not found"
         }
       }
     },
     "parameters": [
       {
         "$ref": "#/parameters/metadataNameParam"
       }
     ]
   },
   "/metadata": {
     "get": {
       "tags": [
         "cluster"
       ],
       "description": "Get list of the metadata cache instances",
       "responses": {
         "200": {
           "description": "list of the metadata cache instances",
           "schema": {
             "$ref": "#/definitions/MetadataList"
           }
         }
       }
     }
   },
   "/routes/{routeName}/config": {
     "get": {
       "tags": [
         "routes"
       ],
       "description": "Get config of a route",
       "responses": {
         "200": {
           "description": "config of a route",
           "schema": {
             "$ref": "#/definitions/RouteConfig"
           }
         },
         "404": {
           "description": "route not found"
         }
       }
     },
     "parameters": [
       {
         "$ref": "#/parameters/routeNameParam"
       }
     ]
   },
   "/routes/{routeName}/status": {
     "get": {
       "tags": [
         "routes"
       ],
       "description": "Get status of a route",
       "responses": {
         "200": {
           "description": "status of a route",
           "schema": {
             "$ref": "#/definitions/RouteStatus"
           }
         },
         "404": {
           "description": "route not found"
         }
       }
     },
     "parameters": [
       {
         "$ref": "#/parameters/routeNameParam"
       }
     ]
   },
   "/routes/{routeName}/health": {
     "get": {
       "tags": [
         "routes"
       ],
       "description": "Get health of a route",
       "responses": {
         "200": {
           "description": "health of a route",
           "schema": {
             "$ref": "#/definitions/RouteHealth"
           }
         },
         "404": {
           "description": "route not found"
         }
       }
     },
     "parameters": [
       {
         "$ref": "#/parameters/routeNameParam"
       }
     ]
   },
   "/routes/{routeName}/destinations": {
     "get": {
       "tags": [
         "routes"
       ],
       "description": "Get destinations of a route",
       "responses": {
         "200": {
           "description": "destinations of a route",
           "schema": {
             "$ref": "#/definitions/RouteDestinationList"
           }
         },
         "404": {
           "description": "route not found"
         }
       }
     },
     "parameters": [
       {
         "$ref": "#/parameters/routeNameParam"
       }
     ]
   },
   "/routes/{routeName}/connections": {
     "get": {
       "tags": [
         "routes"
       ],
       "description": "Get connections of a route",
       "responses": {
         "200": {
           "description": "connections of a route",
           "schema": {
             "$ref": "#/definitions/RouteConnectionsList"
           }
         },
         "404": {
           "description": "route not found"
         }
       }
     },
     "parameters": [
       {
         "$ref": "#/parameters/routeNameParam"
       }
     ]
   },
   "/routes/{routeName}/blockedHosts": {
     "get": {
       "tags": [
         "routes"
       ],
       "description": "Get blocked host list for a route",
       "responses": {
         "200": {
           "description": "blocked host list for a route",
           "schema": {
             "$ref": "#/definitions/RouteBlockedHostList"
           }
         },
         "404": {
           "description": "route not found"
         }
       }
     },
     "parameters": [
       {
         "$ref": "#/parameters/routeNameParam"
       }
     ]
   },
   "/routes": {
     "get": {
       "tags": [
         "routes"
       ],
       "description": "Get list of the routes",
       "responses": {
         "200": {
           "description": "list of the routes",
           "schema": {
             "$ref": "#/definitions/RouteList"
           }
         }
       }
     }
   },
   "/router/status": {
     "get": {
       "tags": [
         "app"
       ],
       "description": "Get status of the application",
       "responses": {
         "200": {
           "description": "status of application",
           "schema": {
             "$ref": "#/definitions/RouterStatus"
           }
         }
       }
     }
   }
 }

The current API (version 20190715), supports the following urls:

  • /metadata/{metadataName}/config
  • /metadata/{metadataName}/status
  • /metadata
  • /routes/{routeName}/config
  • /routes/{routeName}/status
  • /routes/{routeName}/health
  • /routes/{routeName}/destinations
  • /routes/{routeName}/connections
  • /routes/{routeName}/blockedHosts
  • /routes
  • /router/status

Some examples

$ curl -s -u fred:fred http://192.168.91.2:8080/api/20190715/metadata | jq 
{
  "items": [
    {
      "name": "myCluster"
    }
  ]
}
$ curl -s -u fred:fred http://192.168.91.2:8080/api/20190715/metadata/myCluster/status | jq 
{
  "refreshFailed": 0,
  "refreshSucceeded": 3639,
  "timeLastRefreshSucceeded": "2019-07-08T09:17:22.463136Z",
  "lastRefreshHostname": "mysql1",
  "lastRefreshPort": 3306
}
$ curl -s -u fred:fred http://192.168.91.2:8080/api/20190715/metadata/myCluster/config | jq 
{
  "clusterName": "myCluster",
  "timeRefreshInMs": 500,
  "groupReplicationId": "b2025e72-9e5e-11e9-95c9-08002718d305",
  "nodes": [
    {
      "hostname": "mysql1",
      "port": 3306
    },
    {
      "hostname": "mysql2",
      "port": 3306
    }
}

Conclusion

I really invite you to update to the latest version of MySQL Router, don’t forget that even with MySQL InnoDB Cluster 5.7.x you must use the latest MySQL Router 8.0 and MySQL Shell 8.0 and try the new REST API.

Overview on MySQL Shell 8.0.17 Extensions & Plugins and how to write yours !

$
0
0

With MySQL Shell 8.0.17, a super cool new feature was released: the MySQL Shell Extensions & Plugins !

You will be able to write your own extensions for the MySQL Shell. You may already saw that I’ve written some modules like Innotop or mydba for MySQL Shell.

However those plugins were written in Python and only accessible in Python mode. With the new Shell Extensions Infrastructure, this is not the case anymore.

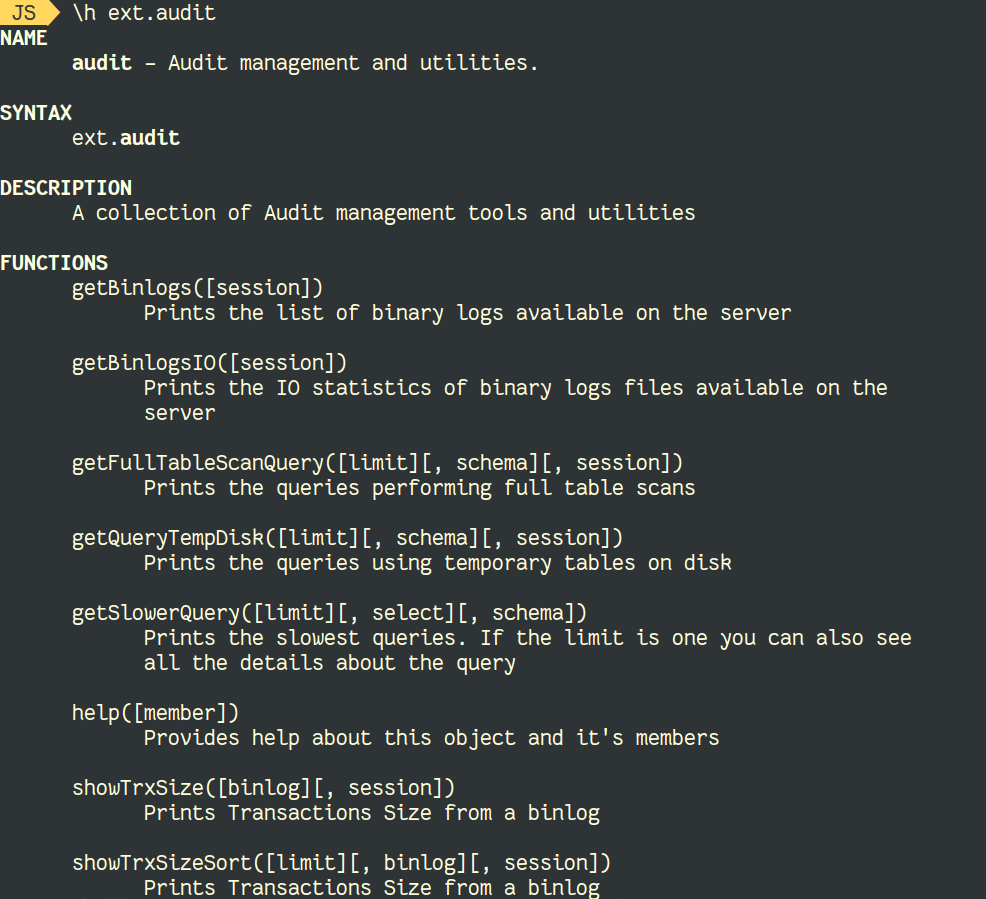
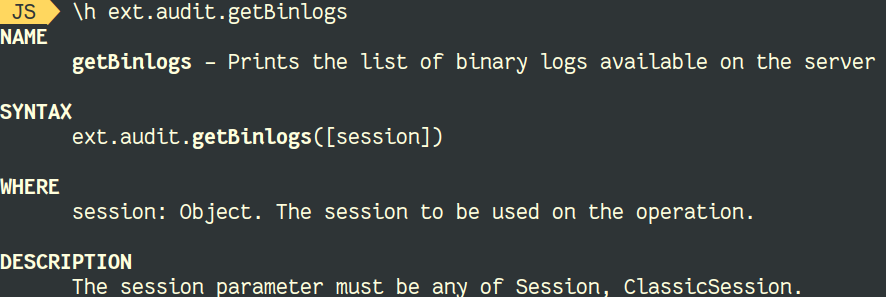
Also, this allows you to populate the help automatically.

Extensions are available from the extglobal object.

Currently we wrote some public extensions available on github and if you look at them, you will see that we tried to sort them in some categories.

Those categories are:

  • async_replica_sets
  • audit
  • configuration
  • demo
  • innodb
  • innodb_cluster
  • performance
  • router
  • schema
  • security
  • support

I will recommend to follow those categories to write your own extensions.

To write your own extension, you will have to write your code under the right folder in its own file. For example demo/oracle8ball.py

from random import randrange

def tell_me():
    """Function that prints the so expected answer
    Returns:
        Nothing
    """

    answers = ["It is certain.", "It is decidedly so.","Without a doubt.",
               "Yes - definitely.", "You may rely on it.",
               "As I see it, yes.","Most likely.","Outlook good.",
               "Yes.","Signs point to yes.","Reply hazy, try again.","Ask again later.",
               "Better not tell you now.","Cannot predict now.",
               "Concentrate and ask again.", "Don't count on it.",
               "My reply is no.","My sources say no.",
               "Outlook not so good.","Very doubtful."]

    print answers[randrange(20)

If the folder where you add your extension file doesn’t have any __init__.py file, you just need to create an empty one.

Then in the existing init.py, you need to register your new extension. So to register demo/oracle8ball.py, I need to edit demo/init.py and add the following lines:

from ext.mysqlsh_plugins_common import register_plugin
from ext.demo import oracle8ball as oracle_8_ball

[...]

try:
    register_plugin("oracle8ball", oracle_8_ball.tell_me,
        {
          "brief": "Get the answer from the Oracle 8 Black Ball",
          "parameters": []
        },
        "demo"
    )
except Exception as e:
    shell.log("ERROR", "Failed to register ext.demo.oracle8ball ({0}).".
        format(str(e).rstrip())

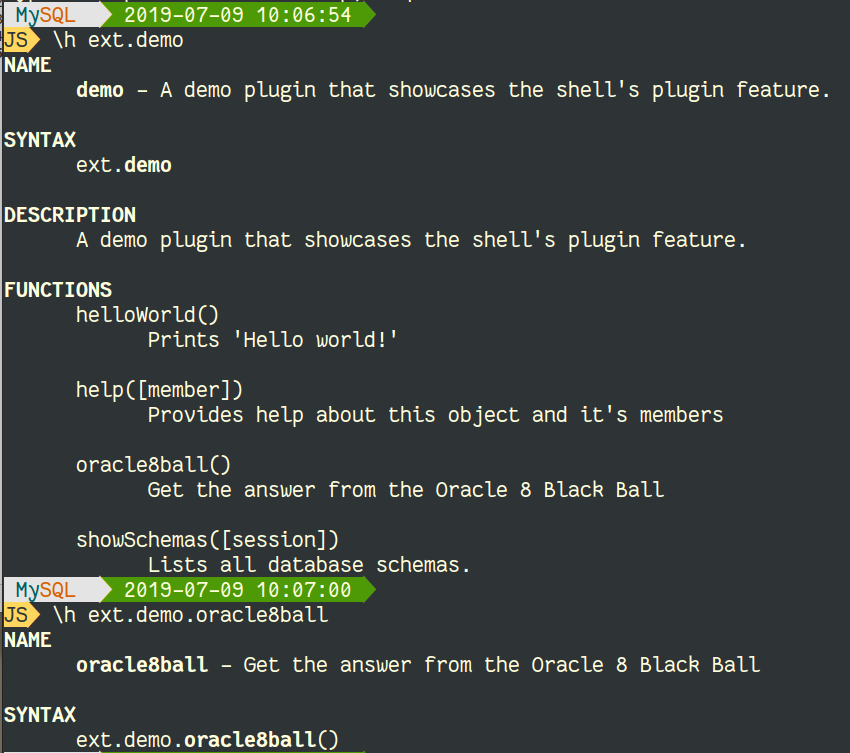
And now you can start MySQL Shell, and first check the help:

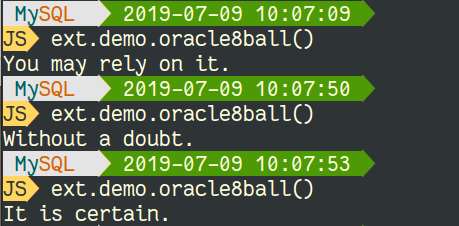
As you can see ext.demo global object contains oracle8ball() method!

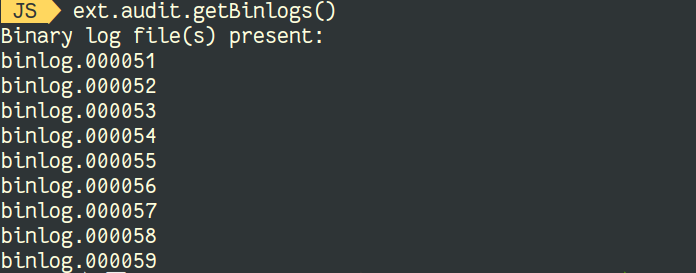
Now can use it in JS:

Or in Python:

As you can see, it’s very easy and very cool to extend the MySQL Shell. In my next post related to the awesome MySQL Shell, I will show you in action some mydba modules migrated to the new extension framework.

Don’t forget to share your own modules, we accept Pull Requests too !

For more details, I also invite you to read this post from my colleague Rennox: MySQL Shell Plugins – Introduction

Create an Asynchronous MySQL Replica in 5 minutes

$
0
0

I have already posted some time ago a post related to the same topic (see here).

Today, I want to explain the easiest way to create an asynchronous replica from an existing MySQL instance, that this time has already data !

The Existing Situation and the Plan

Currently we have a MySQL server using 8.0.17 and GTID enabled on mysql1. mysql2is a single fresh installed instance without any data.

The plan is to create a replica very quickly and using only a SQL connection.

Preliminary Checks

First we verify that mysql1 has GTID enabled. If not we will enable them:

mysql> select @@server_id,@@gtid_mode,@@enforce_gtid_consistency;
+-------------+-------------+----------------------------+
| @@server_id | @@gtid_mode | @@enforce_gtid_consistency |
+-------------+-------------+----------------------------+
|           1 | OFF         | OFF                        |
+-------------+-------------+----------------------------+
1 row in set (0.00 sec)

If you can restart the server:

mysql1> SET PERSIST_ONLY gtid_mode=on;
mysql1> SET PERSIST_ONLY enforce_gtid_consistency=true;
mysql1> RESTART;

If you prefer to not restart the server (if you have others replica already attached to the server, you need to also enable GTID on those replicas):

mysql1> SET PERSIST enforce_gtid_consistency=true;
mysql1> SET PERSIST gtid_mode=off_permissive;
mysql1> SET PERSIST gtid_mode=on_permissive;
mysql1> SET PERSIST gtid_mode=on;
mysql1> INSTALL PLUGIN clone SONAME 'mysql_clone.so'

Since MySQL 8.0.17, we have the possibility to use the amazing CLONE Plugin, that’s why we installed it.

Replication User

It’s time now to create a user we will use to replicate:

mysql1> CREATE USER 'repl'@'%' IDENTIFIED BY 'password' REQUIRE SSL;
mysql1> GRANT REPLICATION SLAVE, BACKUP_ADMIN, CLONE_ADMIN ON *.* TO 'repl'@'%';

You may have noticed two new privileges, BACKUP_ADMINand CLONE_ADMIN, these are required to provision our replica without using any external tool.

Provision the Replica

We can now provision the replica and configure it to replicate from mysql1 but we also need to specify which server can be considered as a potential donor by setting the clone_valid_donor_list variable:

mysql2> SET GLOBAL clone_valid_donor_list='mysql1:3306';
mysql2> CLONE INSTANCE FROM repl@mysql1:3306 IDENTIFIED BY 'password';

Please note that if you want to install the CLONE Plugin on server running with sql_require_primary_key enabled, you won’t be able to install the plugin. See bug #96281 and at the end of this post.

The data has been transferred from the existing MySQL Server (mysql1) , the clone process restarted mysqld and now we can configure the server and start replication:

mysql2> SET PERSIST enforce_gtid_consistency=true;
mysql2> SET PERSIST gtid_mode=off_permissive;
mysql2> SET PERSIST gtid_mode=on_permissive;
mysql2> SET PERSIST gtid_mode=on;
mysql2> SET PERSIST server_id=2;

mysql2> CHANGE MASTER TO MASTER_HOST='mysql1',MASTER_PORT=3306, 
        MASTER_USER='repl', MASTER_PASSWORD='password',     
        MASTER_AUTO_POSITION=1, MASTER_SSL=1;

Conclusion

As you can see, asynchronous replication also benefits from the new CLONE plugin and never made so easy to setup replicas from existing servers with data.

More blog posts about the Clone Plugins:


Bug #96281

I’m adding the description of this problem in this post, so if you search the Internet for the same error, you might find this solution 😉

So, if you server is running with sql_require_primary_key = ON, when you will try to install the CLONE Plugin, it will fail with the following error:

mysql> INSTALL PLUGIN clone SONAME 'mysql_clone.so';
ERROR 1123 (HY000): Can't initialize function 'clone'; 
Plugin initialization function failed.

In the error log, you can see:

2019-07-23T14:58:42.452398Z 8 [ERROR] [MY-013272] [Clone] Plugin Clone reported: 
                              'Client: PFS table creation failed.'
2019-07-23T14:58:42.465800Z 8 [ERROR] [MY-010202] [Server] 
                              Plugin 'clone' init function returned error.

The solution to fix this problem is simple:

mysql> SET sql_require_primary_key=off;
Query OK, 0 rows affected (0.00 sec)

mysql> INSTALL PLUGIN clone SONAME 'mysql_clone.so';
Query OK, 0 rows affected (0.19 sec)

MySQL 8.0.17 and Drupal 8.7

$
0
0

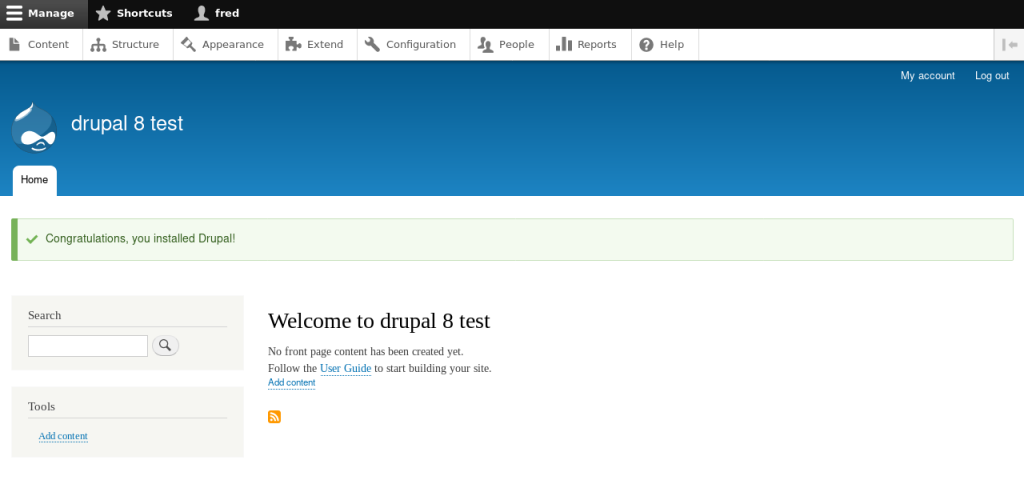
From Drupal’s website, we can see that now the support of MySQL 8 is ready.

I just tested it and it works great !

The only restriction is related to PHP and the support for the new authentication method in php-mysqlnd.

In this previous post, I was happy because it was included in PHP 7.2.8, but this has been reverted back since then. Currently none of the latest version of PHP 7.x is supporting this authentication method.

We can easily verify this, first with the PHP version provided by default in Oracle Linux 8:

# php -i | grep "Loaded plugins\|PHP Version " | tail -n2
PHP Version => 7.2.11
Loaded plugins => mysqlnd,debug_trace,auth_plugin_mysql_native_password,
                  auth_plugin_mysql_clear_password,auth_plugin_sha256_password

And it’s the same with the PHP versions available in Remi’s repositories:

# php71 -i | grep "Loaded plugins\|PHP Version " | tail -n2
PHP Version => 7.1.30
Loaded plugins => mysqlnd,debug_trace,auth_plugin_mysql_native_password,
                  auth_plugin_mysql_clear_password,auth_plugin_sha256_password
# php72 -i | grep "Loaded plugins\|PHP Version " | tail -n2
PHP Version => 7.2.20
Loaded plugins => mysqlnd,debug_trace,auth_plugin_mysql_native_password,
                  auth_plugin_mysql_clear_password,auth_plugin_sha256_password
# php73 -i | grep "Loaded plugins\|PHP Version " | tail -n2
PHP Version => 7.3.7
Loaded plugins => mysqlnd,debug_trace,auth_plugin_mysql_native_password,
                  auth_plugin_mysql_clear_password,auth_plugin_sha256_password

In comparison, with PHP 7.2.9, and PHP 7.2.10 we could see this:

# php -i | grep "Loaded plugins\|PHP Version " | tail -n2
PHP Version => 7.2.9
Loaded plugins => mysqlnd,debug_trace,auth_plugin_mysql_native_password,
                  auth_plugin_mysql_clear_password,
                  auth_plugin_caching_sha2_password,auth_plugin_sha256_password

# php -i | grep "Loaded plugins|PHP Version " | tail -n2
PHP Version => 7.2.10
Loaded plugins => mysqlnd,debug_trace,auth_plugin_mysql_native_password,
                  auth_plugin_mysql_clear_password,
                  auth_plugin_caching_sha2_password,auth_plugin_sha256_password

You can note that auth_plugin_caching_sha2_passwordis present. It has been removed since PHP 7.2.11. (I was not able to find anything in the release notes)

This means that if you are using MySQL 8.0 and Drupal 8.7 with the lastest PHP, you just need to make sure to not forgot when you create the user used by drupal to connect to your database to specify the authentication method like this:

mysql> create user drupal_web identified with 'mysql_native_password' by 'password';

Conclusion

So, yes, kudos to the Drupal team to support MySQL 8.0 ! No patch or change needed anymore (like it was before, see this post).

Unfortunately, PHP mysqlnd doesn’t support yet caching_sha2_password. You can follow the discussions about this in the links below:

MySQL Router 8.0.17’s REST API & MySQL Shell Extensions

$
0
0

You have seen in this previous post, that since 8.0.17, it’s now possible to query the MySQL Router using its REST API.

Additionally, we also saw in this post, that since 8.0.17, we are now able to write extensions to MySQL Shell using the Extension Framework.

Let’s combine both and see how we can integrate the MySQL Router’s REST API in the Shell.

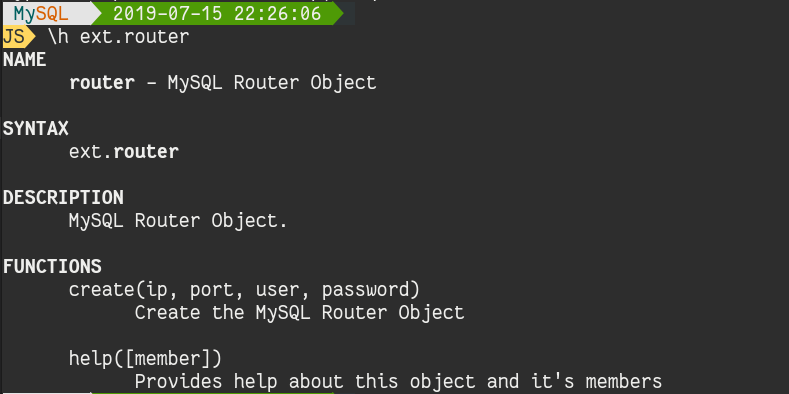
I’ve created an extension in ext.router that creates a MySQL Router Object.

The new extension, as a method to create the object:

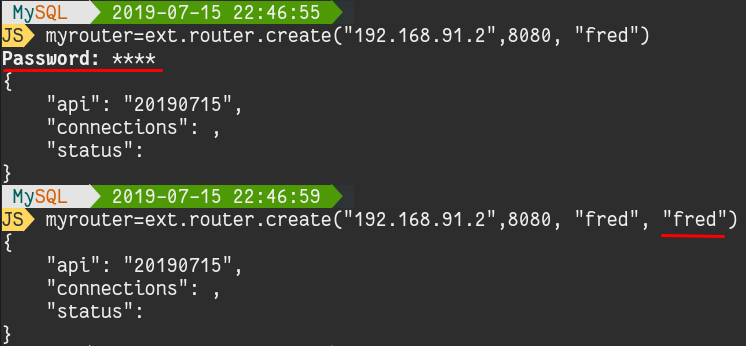
This is an example that illustrates how to create a MySQL Router Object, as you can see you can pass the password directly as parameter but it’s not recommended in interactive mode. It’s recommended the enter it at the prompt:

Now that the object is created, you can see that it has two available methods: status()and connections().

Router Status

With the status() method, we can get information about a MySQL Router.

Let’s see it in action:

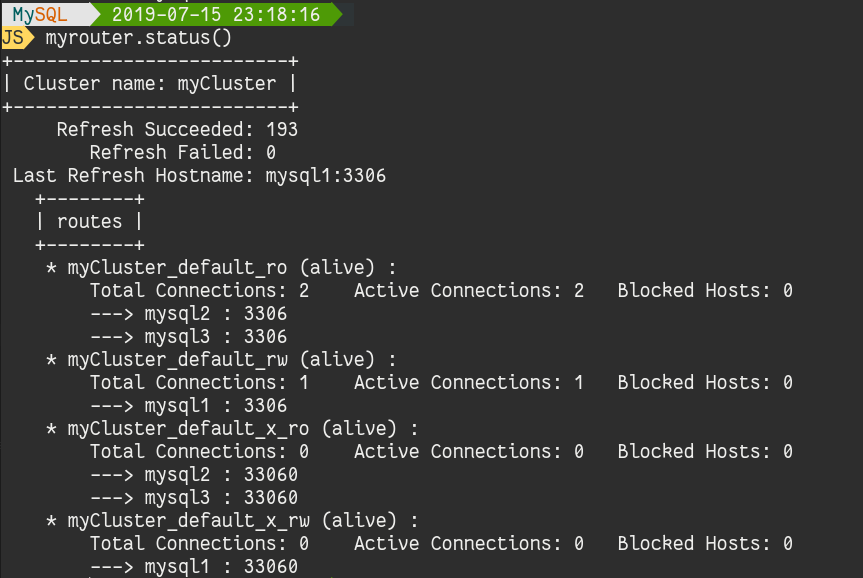
In this example above, we can see that the router is connected to a cluster called myCluster.

The 4 routes are configured and they are all active. We can see some statistics and more interesting, the final destinations for each routes.

Router Connections

The second method is connections().

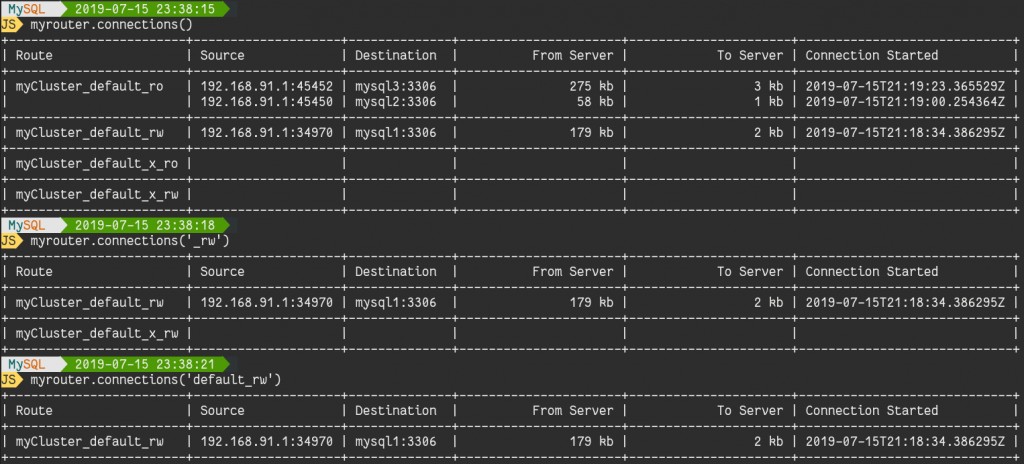
We can see it in action below:

This method returns all the connections that are made to the MySQL Router for each routes (or some if specified) and what it’s the final destination. It also shows some traffic statistics.

Conclusion

This is another great example on how to use together some of the new features that the MySQL teams released in MySQL 8.0.17.

This extension is a bit more complicated as it creates an object that we can use with its methods.

The code is currently available in this branch on github.

There are infinite possibilities to extend the MySQL Shell. Don’t hesitate to share your ideas and contributions !


MySQL InnoDB Cluster, automatic provisioning, firewall and SELinux

$
0
0

You may have noticed that in many of my demos, I disable firewall and SELinux (I even use --initialize-insecure sometimes 😉 ). This is just to make things easier… But in fact enabling iptables and SELinux are not complicated.

Firewall

These examples are compatible with Oracle Linux, RedHat and CentOS. If you use another distro, the principle is the same.

For the firewall, we need first to allow incoming traffic to MySQL and MySQL X ports: 3306 and 33060:

# firewall-cmd --zone=public --add-port=3306/tcp --permanent
# firewall-cmd --zone=public --add-port=33060/tcp --permanent

If you don’t plan to restart the firewall, you just need to run the same commands without --permanent to make then immediately active.

Then we need to allow the Group Replication’s communication port. This is usually 33061 but it can be configured in group_replication_local_address:

# firewall-cmd --zone=public --add-port=33061/tcp --permanent

Now that the firewalls rules are setup, we can restart firewalld and check it:

# systemctl restart firewalld.service
# iptables -L -n | grep 'dpt:3306'
 ACCEPT     tcp  --  0.0.0.0/0            0.0.0.0/0            tcp dpt:3306 ctstate NEW
 ACCEPT     tcp  --  0.0.0.0/0            0.0.0.0/0            tcp dpt:33060 ctstate NEW
 ACCEPT     tcp  --  0.0.0.0/0            0.0.0.0/0            tcp dpt:33061 ctstate NEW

SELinux

When SELinux is enabled, if you don’t allow some ports to be accessed, adding a server to a group will fail.

To see which ports are allowed for mysqld, the following command can be executed:

# semanage port -l | grep -w mysqld_port_t
mysqld_port_t                  tcp      1186, 3306, 63132-63164

With MySQL 8.0.16 and 8.0.17, we need more ports to be accessible. GCS seems to use a port from 30,000 to 50,000:

# semanage port -a -t mysqld_port_t -p tcp 30000-50000

If you have already added the access for MySQL X (33060), XCOM (33061), and admin port (33062), you have to remove them before adding the required range:

# semanage port -d -t mysqld_port_t -p tcp 33060
# semanage port -d -t mysqld_port_t -p tcp 33061
# semanage port -d -t mysqld_port_t -p tcp 33062

If you prefer, you can instead use the following rule:

setsebool -P mysql_connect_any 1

This problem is fixed in our next release.

Conclusion

Using firewall and SELinux is really not complicated even with MySQL InnoDB Cluster.

If you want to setup the MySQL Router on system with iptables and SELinux, you will have to do the same for the ports you will use. The defaults ones are 6446, 6447, 64460 and 64470.

MySQL 8.0 and wrong dates

$
0
0

In MySQL 8.0, when using invalid values for date data types, an error is returned. This was not the case in 5.x versions.

Let’s have a look using the table definition of bug 96361:

CREATE TABLE `new_table` (
  `id_table` int(11) NOT NULL AUTO_INCREMENT,
  `text_table` varchar(45) DEFAULT NULL,
  `date_table` date DEFAULT NULL,
  PRIMARY KEY (`id_table`)
) ENGINE=InnoDB DEFAULT CHARSET=utf8mb4 COLLATE=utf8mb4_0900_ai_ci

Now we can try the following statement in MySQL 5.7 and MySQL 8.0:

MySQL 5.7.26> SELECT id_table, text_table 
              FROM new_table WHERE date_table = '' OR date_table IS NULL;
Empty set, 1 warning (0.01 sec)

MySQL 5.7.26> show warnings;
+---------+------+-----------------------------------------------------------+
| Level   | Code | Message                                                   |
+---------+------+-----------------------------------------------------------+
| Warning | 1292 | Incorrect date value: '' for column 'date_table' at row 1 |
+---------+------+-----------------------------------------------------------+
1 row in set (0.00 sec)

MySQL 8.0.17> SELECT id_table, text_table 
              FROM new_table WHERE date_table = '' OR date_table IS NULL;
ERROR 1525 (HY000): Incorrect DATE value: ''

We can see that in MySQL 5.7, a warning is returned but no error.

In earlier version of 5.x it was by default also possible to store DATEs as 0000-00-00. This is not possible anymore neither in 5.7, neither in 8.0 (by default):

mysql> insert into new_table (text_table, date_table) values ('lefred','0000-00-00');
ERROR 1292 (22007): Incorrect date value: '0000-00-00' for column 'date_table' at row 1

To be able to use 0000-00-00 as date the SQL_MODE need to be changed. By default it contains NO_ZERO_IN_DATE,NO_ZERO_DATE.

mysql8> set @@SQL_MODE='ONLY_FULL_GROUP_BY,STRICT_TRANS_TABLES,ERROR_FOR_DIVISION_BY_ZERO,NO_ENGINE_SUBSTITUTION';
Query OK, 0 rows affected, 1 warning (0.00 sec)

mysql8> select @@SQL_MODE\G
*************************** 1. row ***************************
@@SQL_MODE: ONLY_FULL_GROUP_BY,STRICT_TRANS_TABLES,ERROR_FOR_DIVISION_BY_ZERO,NO_ENGINE_SUBSTITUTION
1 row in set (0.00 sec)

mysql8> insert into new_table (text_table, date_table) values ('lefred','0000-00-00');
Query OK, 1 row affected (0.04 sec)

But even when this is changes, invalid dates (other than invalid 0‘s)are of course still considered as errors in MySQL 8.0:

mysql> SELECT id_table, text_table FROM new_table WHERE date_table = '';
ERROR 1525 (HY000): Incorrect DATE value: ''
mysql> SELECT id_table, text_table FROM new_table WHERE date_table = '2000-00-00';
+----------+------------+
| id_table | text_table |
+----------+------------+
|        2 | lefred     |
+----------+------------+
1 row in set (0.00 sec)

mysql> SELECT id_table, text_table FROM new_table WHERE date_table = '2000-00-01';
Empty set (0.00 sec)

mysql> SELECT id_table, text_table FROM new_table WHERE date_table = '2000-01-32';
ERROR 1525 (HY000): Incorrect DATE value: '2000-01-32'
mysql> SELECT id_table, text_table FROM new_table WHERE date_table = '0000-00-00';
+----------+------------+
| id_table | text_table |
+----------+------------+
|        1 | lefred     |
|        3 | lefred     |
+----------+------------+
2 rows in set (0.00 sec)

This is because when comparing DATE values with constant strings, MySQL first tries to convert the string to a DATE and then to perform the comparison. Before 8.0 (8.0.16) when the conversion failed, MySQL executed the comparison treating the DATE as a string. Now in such cases, if the conversion of the string to a DATE fails, the comparison fails with ER_WRONG_VALUE.

Migrate from a single MySQL Instance to MySQL InnoDB Cluster using CLONE plugin

$
0
0

When somebody wants to migrate from a single MySQL instance to a full HA solution using MySQL InnoDB Cluster, the best solution to reduce the downtime is to use asynchronous replication and switch database only once at a certain point in time when everything is ready. This is almost what I explained already in this post.

The most difficult part was related to the provisioning of the existing data to the new cluster members. A backup (physical or logical) was required. It should have been restored on every nodes and we had to be sure to not mess up with the GTIDs.

This is not more the case since MySQL 8.0.17 ! Now we can use the CLONE plugin to start the cluster provisioning too.

The current situation

We have a single instance of MySQL 8.0.17 to serve the application. If that server crashes, we don’t have database service available anymore.

That’s the reason why we want to setup a MySQL InnoDB Cluster.

Install a new server

We install an empty MySQL server 8.0.17 on a new machine: mysql1.

When the server is installed, we start it and as the finality is to use MySQL InnoDB Cluster, we enable directly GTIDs on both servers. Then we install the CLONE Plugin on it. We install the CLONE Plugin on the production server too (single).

We add single:3306 in the clone_valid_donor_list and we initiate a remote clone from mysql1 to single.

MySQL InnoDB Cluster Creation

Now that we have a new server with a snapshot of the production’s data, we can create an InnoDB Cluster out of it.

When the cluster is created with a single member, we can add the other 2 new servers. They will also get their initial snapshot from mysql1 using CLONE.

Retrieve last data from production

The fully HA cluster is ready and running with 3 members. We need to recover all the data that was written in production while we were creating this awesome cluster.

Therefor, we will use Asynchronous Replication from single to the Primary Member in the Cluster (mysql1). We wait for the cluster to catch up before we continue.

MySQL Router

Finally, we can bootstrap the MySQL Router. Ideally on the app server. When the router is installed (bootstrap), we can start it and stop the application. This is the only downtime, very short during the full migration. After having stopped the application, we can restart it and this time the application needs to connect to the MySQL Router.

All in video

You can now watch all the steps on the video below):

Conclusion

It’s now very easy to migrate from an architecture to a new one using the CLONE Plugin. Also this plugin really simplify the cluster creation when new nodes need to be added.

MySQL 8.0 Memory Consumption on Small Devices

$
0
0

Recently, PeterZ pointed a huge difference in memory usage of MySQL 8.0 compare to MySQL 5.7. This can be an issue for small instances if the same configuration for buffers like the buffer pool are not changed.

As explained in Peter’s article, this can lead to the awakening of the so feared OOM Killer !

MorganT, pointed accurately in his comment what is the source of such difference and how this was then caused by the new instrumentation added in MySQL 8.0.

Nothing is free, even as a beer. There is always a cost for more features.

This is a small non exhaustive list relating some additions in Performance_Schema:

However, if you plan to use MySQL 8.0 on small devices and still benefit of Performance_Schema, you can reduce its memory consumption.

Here is an example of the memory consumption of a fresh installed MySQL 8.0.17 with Peter’s config (adapted for native MySQL 8.0):

+---------------------------+---------------+
| code_area                 | current_alloc |
+---------------------------+---------------+
| memory/innodb             | 319.66 MiB    |
| memory/performance_schema | 268.40 MiB    | <--
| memory/mysys              | 8.58 MiB      |
| memory/sql                | 3.59 MiB      |
| memory/temptable          | 1.00 MiB      |
| memory/mysqld_openssl     | 134.50 KiB    |
| memory/mysqlx             | 3.44 KiB      |
| memory/vio                | 912 bytes     |
| memory/myisam             | 696 bytes     |
| memory/csv                | 88 bytes      |
| memory/blackhole          | 88 bytes      |
+---------------------------+---------------+

The total memory consumption is the following:

MySQL 8.0> select * from sys.memory_global_total;
+-----------------+
| total_allocated |
+-----------------+
| 615.54 MiB      |
+-----------------+

Now let’s adapt the Performance_Schema configuration to reduce it’s memory consumption and see the result:

+---------------------------+---------------+
| code_area                 | current_alloc |
+---------------------------+---------------+
| memory/innodb             | 319.66 MiB    |
| memory/performance_schema | 89.88 MiB     | <--
| memory/mysys              | 8.58 MiB      |
| memory/sql                | 3.59 MiB      |
| memory/temptable          | 1.00 MiB      |
| memory/mysqld_openssl     | 134.50 KiB    |
| memory/mysqlx             | 3.44 KiB      |
| memory/vio                | 912 bytes     |
| memory/myisam             | 696 bytes     |
| memory/csv                | 88 bytes      |
| memory/blackhole          | 88 bytes      |
+---------------------------+---------------+

We can see the total memory used:

MySQL 8.0> select * from sys.memory_global_total;
+-----------------+
| total_allocated |
+-----------------+
| 437.39 MiB      |
+-----------------+

These are the changes performed:

MySQL 8.0> SELECT t1.VARIABLE_NAME, VARIABLE_VALUE 
           FROM performance_schema.variables_info t1 
           JOIN performance_schema.global_variables t2 
             ON t2.VARIABLE_NAME=t1.VARIABLE_NAME 
          WHERE t1.VARIABLE_SOURCE = 'PERSISTED'; 
+----------------------------------------------------------+----------------+
| VARIABLE_NAME                                            | VARIABLE_VALUE |
+----------------------------------------------------------+----------------+
| performance_schema_digests_size                          | 1000           |
| performance_schema_error_size                            | 1              |
| performance_schema_events_stages_history_long_size       | 1000           |
| performance_schema_events_statements_history_long_size   | 1000           |
| performance_schema_events_transactions_history_long_size | 1000           |
| performance_schema_events_waits_history_long_size        | 1000           |
| performance_schema_max_cond_classes                      | 80             |
| performance_schema_max_digest_length                     | 512            |
| performance_schema_max_mutex_classes                     | 210            |
| performance_schema_max_rwlock_classes                    | 50             |
| performance_schema_max_sql_text_length                   | 512            |
| performance_schema_max_stage_classes                     | 150            |
| performance_schema_max_thread_classes                    | 50             |
+----------------------------------------------------------+----------------+

So, indeed it’s the default instrumentation settings may not fit small instances but it’s not very complicated to modify them. This is how I modified them using the new SET PERSIST statement:

set persist_only performance_schema_events_waits_history_long_size=1000;

If you are interested in this new statement, please check these articles:

MySQL 8.0: if I should optimize only one query on my application, which one should it be ?

$
0
0

Answering this question is not easy. Like always, the best response is “it depends” !

But let’s try to give you all the necessary info the provide the most accurate answer. Also, may be fixing one single query is not enough and looking for that specific statement will lead in finding multiple problematic statements.

The most consuming one

The first candidate to be fixed is the query that consumes most of the execution time (latency). To identify it, we will use the sys schema and join it with events_statements_summary_by_digest from performance_schemato retrieve a real example of the query (see this post for more details).

Let’s take a look at what sys schema has to offer us related to our mission:

> show tables like 'statements_with%';
+---------------------------------------------+
| Tables_in_sys (statements_with%)            |
+---------------------------------------------+
| statements_with_errors_or_warnings          |
| statements_with_full_table_scans            |
| statements_with_runtimes_in_95th_percentile |
| statements_with_sorting                     |
| statements_with_temp_tables                 |
+---------------------------------------------+

We will then use the statements_with_runtimes_in_95th_percentile to achieve our first task. However we will use the version of the view with raw data (not human readable formatted), to be able to sort the results as we want. The raw data version of sysschema views start with x$:

SELECT schema_name, format_time(total_latency) tot_lat,   
       exec_count, format_time(total_latency/exec_count) latency_per_call, 
       query_sample_text 
  FROM sys.x$statements_with_runtimes_in_95th_percentile AS t1
  JOIN performance_schema.events_statements_summary_by_digest AS t2 
    ON t2.digest=t1.digest 
 WHERE schema_name NOT in ('performance_schema', 'sys') 
ORDER BY (total_latency/exec_count) desc LIMIT 1\G
*************************** 1. row ***************************
      schema_name: library
          tot_lat: 857.29 ms
       exec_count: 1
 latency_per_call: 857.29 ms
query_sample_text: INSERT INTO `books` (`doc`) VALUES ('{\"_id\": \"00005d44289d000000000000007d\", \"title\": \"lucky luke, tome 27 : l alibi\", \"isbn10\": \"2884710086\", \"isbn13\": \"978-2884710084\", \"langue\": \"français\", \"relié\": \"48 pages\", \"authors\": [\"Guylouis (Auteur)\", \"Morris (Illustrations)\"], \"editeur\": \"lucky comics (21 décembre 1999)\", \"collection\": \"lucky luke\", \"couverture\": \" data:image/jpeg;base64,/9j/4AAQSkZJRgABAQAAAQABAAD/2wBDABQODxIPDRQSEBIXFRQYHjIhHhwcHj0sLiQySUBMS0dARkVQWnNiUFVtVkVGZIhlbXd7gYKBTmCNl4x9lnN+gXz/2wBDARUXFx4aHjshITt8U0ZTfHx8fHx8fHx8fHx8fHx8fHx8fHx8fHx8fHx8fHx8fHx8fHx8fHx8fHx8fHx8fHx8fHz/wAARCAEfANwDASIAAhEBAxEB/8QAHwAAAQUBAQEBAQEAAAAAAAAAAAECAwQFBgcICQoL/8QAtRAAAgEDAwIEAwUFBAQAAAF9AQIDAAQRBRIhMUEGE1FhByJxFDKBkaEII0KxwRVS0fAkM2JyggkKFhcYGRolJicoKSo0NTY3ODk6Q0RFRkdISUpTVFVWV1hZWmNkZWZnaGlqc3R1dnd4eXqDhIWGh4iJipKTlJWWl5iZmqKjpKWmp6ipqrKztLW2t7i5usLDxMXGx8jJytLT1NXW19jZ2uHi4+Tl5ufo6erx8vP09fb3+Pn6/8QAHwEAAwEBAQEBAQEBAQAAAAAAAAECAwQFBgcICQoL/8QAtREAAgECBAQDBAcFBA...
1 row in set (0.2838 sec)

This statement is complicated to optimize as it’s a simple insert, and it was run only once. Insert can be slower because of disk response time (I run in full durability of course). Having too many indexes may also increase the response time, this is why I invite you to have a look at these two sysschema tables:

  • schema_redundant_indexes
  • schema_unused_indexes

You will have to play with the limit of the query to find some valid candidates and then, thanks to the query_sample_text we have the possibility to run an EXPLAIN on the query without having to rewrite it !

Full table scans

Another query I would try to optimize is the one doing full table scans:

SELECT schema_name, sum_rows_examined, (sum_rows_examined/exec_count) avg_rows_call,
       format_time(total_latency) tot_lat, exec_count,
       format_time(total_latency/exec_count) AS latency_per_call,
       query_sample_text 
  FROM sys.x$statements_with_full_table_scans AS t1
  JOIN performance_schema.events_statements_summary_by_digest AS t2 
    ON t2.digest=t1.digest 
 WHERE schema_name NOT in ('performance_schema', 'sys') 
ORDER BY (total_latency/exec_count) desc LIMIT 1\G
*************************** 1. row ***************************
       schema_name: wp_lefred
 sum_rows_examined: 268075
     avg_rows_call: 3277.0419
           tot_lat: 31.31 s
        exec_count: 124
  latency_per_call: 252.47 ms
 query_sample_text: SELECT count(*) as mytotal
                 FROM wp_posts
                 WHERE (post_content LIKE '%youtube.com/%' 
                   OR post_content LIKE '%youtu.be/%')
                 AND post_status = 'publish'
 1 row in set (0.0264 sec)

We can then see that this query was executed 124 times for a total execution time of 31.31 seconds which makes 252.47 milliseconds per call. We can also see that this query examined more than 268k rows which means that on average those full table scans are examining 3277 records per query.

This is a very good one for optimization.

Temp tables

Creating temporary tables is also sub optimal for your workload, if you have some slow ones you should have identified them already with the previous queries. But if you want to hunt those specifically, once again, sys schema helps you to catch them:

SELECT schema_name, format_time(total_latency) tot_lat, exec_count, 
       format_time(total_latency/exec_count) latency_per_call, query_sample_text 
  FROM sys.x$statements_with_temp_tables AS t1
  JOIN  performance_schema.events_statements_summary_by_digest AS t2
    ON t2.digest=t1.digest 
 WHERE schema_name NOT in ('performance_schema', 'sys') AND disk_tmp_tables=1
ORDER BY 2 desc,(total_latency/exec_count) desc LIMIT 1\G

Fortunately, I had none on my system.

Query optimization is not the most exiting part of the DBA job… but it has to be done ;-). You have now an easy method to find where to start, good luck ! And don’t forget that if you need any help, you can always joins the MySQL Community Slack channel !

Join the Code ONE MySQL Track at Oracle Open World in San Francisco

$
0
0

Mid September, MySQL Community, MySQL Customers and MySQL Engineers will be in San Francisco to share their experience and present the new features of your favorite database !

The event will be held in Moscone South (just Mirko Ortensi‘s Hands-on Lab will be delivered in Moscone West).

During the week, the MySQL Community Team will host the traditional MySQL Reception. We got so great feedback from last year that we decided to renew the experience in the same awesome location, the Samovar Tea Lounge at Yerba Buena Gardens. Don’t forget that you need to register for this reception but no OOW pass is required. Please register here !

Back to the conference, you can find the full schedule for the session in the MySQL Track of the Oracle Code ONE’s Catalog.

If you have heard about our MySQL Analytics Service earlier and want to get real feedback from users, please join Mercari and Credorax sessions, they will share their user experience.

Facebook will present how they use MySQL at Scale and how they use MySQL 8.0.

You will also have the possibility to learn about MySQL’s offer in the Oracle Cloud joining Airton Lastori‘s sessions, DEV4124 and DEV2037.

Security, Backups, High Availability, you will be able to attend sessions from the best experts and meet them during the conference.

This year, we will also be present at the Oracle Code ONE Meet the Experts in the lounge C of the Code One Groundbreakers Hub area in Moscone South, Level 0. You will have to possibility to join those discussions where we will talk about MySQL Performance, MySQL High Availability and MySQL Document Store.

And of course, we don’t forget developers with sessions on the X DEV API and MySQL Document Store in Java, Node.JS and Python!

We hope to meet you in the Bay Area very soon ! #MySQL8isGreat

How to integrate ProxySQL in MySQL InnoDB Cluster

$
0
0

MySQL InnoDB Cluster is the most easy and integrated High Availability solution for MySQL.

The solution is composed of:

  • MySQL Server
  • MySQL Group Replication Plugin
  • MySQL Clone Plugin
  • MySQL Router
  • MySQL Shell

All those components are developed and tested together to provide the easiest and best experience to the MySQL users.

As the MySQL Router is a TCP Level 4 router (like HA Proxy), some users requiring a more “intelligent” proxy having other extra features like caching, read/write splitting in relation with the user or SQL, firewall, … may be interested in using ProxySQL… and this is a good choice !

ProxySQL / MySQL Router in OSI Model

However, even is ProxySQL supports MysQL Group Replication, for users coming from the easy experience when using MySQL InnoDB Cluster, the configuration might be a little confusing.

This is why I’ve created a plugin for the MySQL Shell to configure and use ProxySQL with MySQL InnoDB Cluster.

The plugin creates the hostgroups, the monitor user. It also allows you to import users from your cluster to ProxySQL without having to know any user password and leaved them hashed.

If the SYS Schema view used to monitor the cluster is missing, the plugin will also add it.

Let’s have a look on how to use it.

Installing the plugin

To install the plugin, the easiest way it to clone my github repository as ~/.mysqlsh/plugins/ext.

Then when you start MySQL Shell, you should have to possibility to see some objects in the ext global object:

ext global object completion using TAB

Preparing ProxySQL

On ProxySQL, you need to create an admin user that can connect remotely (from where you orchestrate your environment using the MySQL Shell). ProxySQL allows only adminto connect from localhost.

In /etc/proxysql.cnf, you modify the admin_variable like this:

admin_credentials="admin:admin;radmin:fred"

If you do so, you need to stop ProxySQL, remove the proxysql.db (usually in /var/lib/proxysql) and restart ProxySQL.

Now you are able to connect to ProxySQL’s SQL admin interface:

[root@mysql1 proxysql]# mysql -h 192.168.91.2 -P 6032 -u radmin -pfred
 mysql: [Warning] Using a password on the command line interface can be insecure.
 Welcome to the MySQL monitor.  Commands end with ; or \g.
 Your MySQL connection id is 5
 Server version: 5.5.30 (ProxySQL Admin Module)
 Copyright (c) 2000, 2019, Oracle and/or its affiliates. All rights reserved.
 Oracle is a registered trademark of Oracle Corporation and/or its
 affiliates. Other names may be trademarks of their respective
 owners.
 Type 'help;' or '\h' for help. Type '\c' to clear the current input statement.

Using the MySQL Shell

Let’s consider that we have a MySQL InnoDB Cluster like this:

{
     "clusterName": "myCluster", 
     "defaultReplicaSet": {
         "name": "default", 
         "primary": "mysql1:3306", 
         "ssl": "REQUIRED", 
         "status": "OK", 
         "statusText": "Cluster is ONLINE and can tolerate up to ONE failure.", 
         "topology": {
             "mysql1:3306": {
                 "address": "mysql1:3306", 
                 "mode": "R/W", 
                 "readReplicas": {}, 
                 "replicationLag": null, 
                 "role": "HA", 
                 "status": "ONLINE", 
                 "version": "8.0.17"
             }, 
             "mysql2:3306": {
                 "address": "mysql2:3306", 
                 "mode": "R/O", 
                 "readReplicas": {}, 
                 "replicationLag": null, 
                 "role": "HA", 
                 "status": "ONLINE", 
                 "version": "8.0.17"
             }, 
             "node3": {
                 "address": "mysql3:3306", 
                 "mode": "R/O", 
                 "readReplicas": {}, 
                 "replicationLag": null, 
                 "role": "HA", 
                 "status": "ONLINE", 
                 "version": "8.0.17"
             }
         }, 
         "topologyMode": "Single-Primary"
     }, 
     "groupInformationSourceMember": "mysql1:3306"
 }

We need to connect to one of the node, but for the configuration (writing the SYS Schema view used by ProxySQL and the monitor user, it’s better to connect directly to the primary master, mysql1 in our example. Once connected, we can create a ext.proxysql object by connecting to ProxySQL:

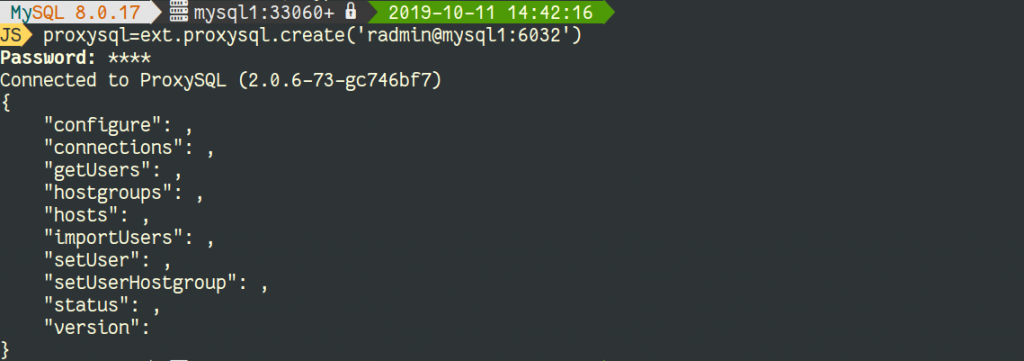
ext.proxysql creation in MySQL Shell – returning all methods

We can now use any method. But we also need to configure ProxySQL to use our MySQL InnoDB Cluster:

Great ! It’s possible now to see the hosts configured directly in ProxySQL and also the hostgroups that the plugin automatically created:

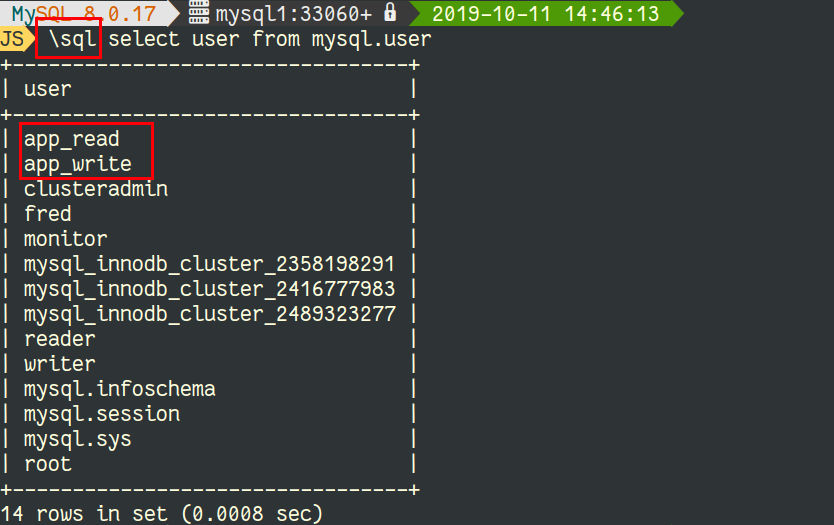
Now we can also import in ProxySQL the users that will connect to MySQL using the proxy. First let’s check the users created in MySQL:

List of users created in our MySQL InnoDB Cluster (in SQL mode)

As we only want the app_% users to be imported in ProxySQL, we will use the importUsers() method, the first parameter is the hostgroup id:

Import of MySQL users in ProxySQL

As you can see they are all imported in the hostgroup 2. We need to put our app_read user in hostgroup 3 (secondary / R/O) using setUserHostgroup() method:

As you can see, by default, the read/write split is done via the user. Of course you can still write your routing rules to the desired hostgroup.

And finally, we can see the usage and some statistics in the Shell using the status() method:

ProxySQL object status() method output

Conclusion

Thanks to the MySQL Shell’s plugin framework, it’s now possible to use ProxySQL with MySQL InnoDB Cluster with the same level of ease !

Don’t hesitate to test the plugin, improve it and submit pull requests 😉


MySQL & InnoDB Disk Space

$
0
0

Yesterday, Bhuvanesh published an article about how to verify the difference between allocated diskspace for a tablespace and the the data in it.

I commented with an old post explaining how to get some similar info only using SQL in case you don’t have filesystem access.

And finally, my friend Bill Karwin, commented how this info is not always accurate. Which, of course, I agree with.

This is why, I checked what info we have available and try to find some better answer.

So first, please remind that information_schema statistics are cached by default:

mysql> show global variables like 'information_schema_stats_expiry';
+---------------------------------+-------+
| Variable_name                   | Value |
+---------------------------------+-------+
| information_schema_stats_expiry | 86400 |
+---------------------------------+-------+

And that for better results, it’s always advised to run ANALYZE TABLE ...

For the following examples, I set information_schema_stats_expiry to 0.

The New Query

The new query takes advantage of the column FILE_SIZE in Performance_Schema.INNODB_TABPLESPACES:

> SELECT NAME, TABLE_ROWS, format_bytes(data_length) DATA_SIZE,
       format_bytes(index_length) INDEX_SIZE,
       format_bytes(data_length+index_length) TOTAL_SIZE,
       format_bytes(data_free) DATA_FREE,
       format_bytes(FILE_SIZE) FILE_SIZE,
       format_bytes((FILE_SIZE/10 - (data_length/10 + 
                           index_length/10))*10) WASTED_SIZE  
FROM information_schema.TABLES as t 
JOIN information_schema.INNODB_TABLESPACES as it 
  ON it.name = concat(table_schema,"/",table_name) 
ORDER BY (data_length + index_length) desc limit 5;
+-------------------+------------+------------+------------+------------+------------+------------+-------------+
| NAME              | TABLE_ROWS | DATA_SIZE  | INDEX_SIZE | TOTAL_SIZE | DATA_FREE  | FILE_SIZE  | WASTED_SIZE |
+-------------------+------------+------------+------------+------------+------------+------------+-------------+
| big/testing       |   10241204 | 647.98 MiB |    0 bytes | 647.98 MiB | 2.00 MiB   | 660.00 MiB | 12.02 MiB   |
| docstore/all_recs |      24353 | 17.56 MiB  |    0 bytes | 17.56 MiB  |    0 bytes | 25.00 MiB  | 7.44 MiB    |
| big/pktest        |     111649 | 11.55 MiB  |    0 bytes | 11.55 MiB  |    0 bytes | 19.00 MiB  | 7.45 MiB    |
| big/pktest_seq    |      81880 | 6.52 MiB   |    0 bytes | 6.52 MiB   |    0 bytes | 14.00 MiB  | 7.48 MiB    |
| library/books     |         39 | 384.00 KiB | 16.00 KiB  | 400.00 KiB |    0 bytes | 464.00 KiB | 64.00 KiB   |
+-------------------+------------+------------+------------+------------+------------+------------+-------------+

We can see that MySQL estimates that the datasize for my biggest table is 648MB and that 660MB are used on the disk. The last info is very easy to verify:

$ sudo ls -lh /var/lib/mysql/big/testing.ibd
-rw-r----- 1 mysql mysql 660M Oct 22 00:19 /var/lib/mysql/big/testing.ibd

As I recommended it, it’s always good to do an ANALYZE TABLE:

> analyze table big.testing;
+-------------+---------+----------+----------+
| Table       | Op      | Msg_type | Msg_text |
+-------------+---------+----------+----------+
| big.testing | analyze | status   | OK       |
+-------------+---------+----------+----------+

And we can run again our query:

+-------------------+------------+------------+------------+------------+------------+------------+-------------+
| NAME              | TABLE_ROWS | DATA_SIZE  | INDEX_SIZE | TOTAL_SIZE | DATA_FREE  | FILE_SIZE  | WASTED_SIZE |
+-------------------+------------+------------+------------+------------+------------+------------+-------------+
| big/testing       |    9045529 | 582.42 MiB |    0 bytes | 582.42 MiB | 67.00 MiB  | 660.00 MiB | 77.58 MiB   |
| docstore/all_recs |      24353 | 17.56 MiB  |    0 bytes | 17.56 MiB  |    0 bytes | 25.00 MiB  | 7.44 MiB    |
| big/pktest        |     111649 | 11.55 MiB  |    0 bytes | 11.55 MiB  |    0 bytes | 19.00 MiB  | 7.45 MiB    |
| big/pktest_seq    |      81880 | 6.52 MiB   |    0 bytes | 6.52 MiB   |    0 bytes | 14.00 MiB  | 7.48 MiB    |
| library/books     |         39 | 384.00 KiB | 16.00 KiB  | 400.00 KiB |    0 bytes | 464.00 KiB | 64.00 KiB   |
+-------------------+------------+------------+------------+------------+------------+------------+-------------+

We can see now that the statistics have been updated and that according to my previous post, we are loosing 67MB but with the new one comparing to disk, it seems we are wasting 77.5MB on disk.

Let’s see how to table looks like using innodb_ruby:

Recovering the disk space

Let’s see if we can recover some disk space:

> OPTIMIZE table big.testing;
+-------------+----------+----------+-------------------------------------------------------------------+
| Table       | Op       | Msg_type | Msg_text                                                          | 
+-------------+----------+----------+-------------------------------------------------------------------+
| big.testing | optimize | note     | Table does not support optimize, doing recreate + analyze instead |
| big.testing | optimize | status   | OK                                                                |
+-------------+----------+----------+-------------------------------------------------------------------+
 2 rows in set (1 min 4.8855 sec)

And we can check again:

+-------------------+------------+------------+------------+------------+------------+------------+-------------+
| NAME              | TABLE_ROWS | DATA_SIZE  | INDEX_SIZE | TOTAL_SIZE | DATA_FREE  | FILE_SIZE  | WASTED_SIZE |
+-------------------+------------+------------+------------+------------+------------+------------+-------------+
| big/testing       |    9045529 | 582.42 MiB |    0 bytes | 582.42 MiB | 67.00 MiB  | 584.00 MiB | 1.58 MiB    |
| docstore/all_recs |      24353 | 17.56 MiB  |    0 bytes | 17.56 MiB  |    0 bytes | 25.00 MiB  | 7.44 MiB    |
| big/pktest        |     111649 | 11.55 MiB  |    0 bytes | 11.55 MiB  |    0 bytes | 19.00 MiB  | 7.45 MiB    |
| big/pktest_seq    |      81880 | 6.52 MiB   |    0 bytes | 6.52 MiB   |    0 bytes | 14.00 MiB  | 7.48 MiB    |
| library/books     |         39 | 384.00 KiB | 16.00 KiB  | 400.00 KiB |    0 bytes | 464.00 KiB | 64.00 KiB   |
+-------------------+------------+------------+------------+------------+------------+------------+-------------+

We can see that now we have regain some disk space !

So even if this is not always 100% accurate, this method provides you already a very close to reality view of how your InnoDB Tablespaces are using the disk and when you will benefit from rebuilding your tablespace.

MySQL Shell Plugin

I’ve updated the innodb/fragmented MySQL Shell Plugin on my github with a new method:

Setup 2 MySQL InnoDB Clusters on 2 DCs and link them for DR

$
0
0

This article is an update of a previous post explaining how to setup a second cluster on a second data center to be used as disaster recovery (or to run some off site queries, like long reports, etc..).

This new article covers also the CLONE plugin. Before you ask, CLONE plugin and Replication Channel Based Filters are only available in MySQL 8.0 ! It’s time to upgrade, MySQL 8 is Great !

Also, for DR only, a single MySQL instance acting as asynchronous replica is enough. But if for any reason you want to also have a HA cluster in the second data center, not using replication channel based filers is not the recommended solution and requires to hack with multiple MySQL Shell versions. You should forget about it.

So, if you plan to have 2 clusters, the best option is to setup the asynchronous link between the two clusters and use replication channel based filters. Please be warned that there is NO conflict detection between the two clusters and if you write on both conflicting data at the same time, you are looking for troubles !

So we have in DC1 the following cluster:

MySQL  mysql-dc1-1:33060+ ssl  JS > cluster.status()
 {
     "clusterName": "clusterDC1", 
     "defaultReplicaSet": {
         "name": "default", 
         "primary": "mysql-dc1-1:3306", 
         "ssl": "REQUIRED", 
         "status": "OK", 
         "statusText": "Cluster is ONLINE and can tolerate up to ONE failure.", 
         "topology": {
             "mysql-dc1-1:3306": {
                 "address": "mysql-dc1-1:3306", 
                 "mode": "R/W", 
                 "readReplicas": {}, 
                 "replicationLag": null, 
                 "role": "HA", 
                 "status": "ONLINE", 
                 "version": "8.0.18"
             }, 
             "mysql-dc1-2:3306": {
                 "address": "mysql-dc1-2:3306", 
                 "mode": "R/O", 
                 "readReplicas": {}, 
                 "replicationLag": null, 
                 "role": "HA", 
                 "status": "ONLINE", 
                 "version": "8.0.18"
             }, 
             "mysql-dc1-3:3306": {
                 "address": "mysql-dc1-3:3306", 
                 "mode": "R/O", 
                 "readReplicas": {}, 
                 "replicationLag": null, 
                 "role": "HA", 
                 "status": "ONLINE", 
                 "version": "8.0.18"
             }
         }, 
         "topologyMode": "Single-Primary"
     }, 
     "groupInformationSourceMember": "mysql-dc1-1:3306"

And we would like to have similar cluster on the second DC:

  • clusterDC2
    • mysql-dc2-1
    • mysql-dc2-2
    • mysql-dc2-3

The first thing we will do is to CLONE the dataset from clusterDC1 to mysql-dc2-1. To do so, we will create an user with the required
privileges on the Primary-Master in DC1 :

SQL > CREATE USER 'repl'@'%' IDENTIFIED BY 'password' REQUIRE SSL;
SQL > GRANT REPLICATION SLAVE, BACKUP_ADMIN, CLONE_ADMIN 
      ON . TO 'repl'@'%';

I explained this process in this post.

Now in mysql-dc2-1 we will create a cluster after having done dba.configureInstance(…) (I usualy create a dedicated user to manage the cluster):

MySQL  mysql-dc2-1:33060+ ssl  JS > cluster2=dba.createCluster('clusterDC2')

From the user we created, we need to add the required privilege for CLONE:

SQL > GRANT CLONE_ADMIN ON *.*  TO clusteradmin;
SQL > SET GLOBAL clone_valid_donor_list='192.168.222.3:3306';

We can now stop Group Replication and start the CLONE process:

MySQL  mysql-dc2-1:33060+ ssl  SQL > stop group_replication;
MySQL  mysql-dc2-1:33060+ ssl  SQL > set global super_read_only=0;

MySQL  127.0.0.1:3306 ssl  SQL > CLONE INSTANCE FROM
                   repl@192.168.222.3:3306 IDENTIFIED BY 'password';

Now we have the same data on mysql-dc2-1 and we can recreate the cluster as it has been overrided by the CLONE process. After that, we will be able to join the other two servers of DC2:

MySQL mysql-dc2-1:33060+ ssl JS > cluster=dba.createCluster(‘clusterDC2’)

MySQL  mysql-dc2-1:33060+ ssl  JS > cluster=dba.createCluster('clusterDC2')
MySQL  mysql-dc2-1:33060+ ssl  JS > cluster.addInstance('clusteradmin@mysql-dc2-2')
MySQL  mysql-dc2-1:33060+ ssl  JS > cluster.addInstance('clusteradmin@mysql-dc2-3')

We finally have our second cluster in our Disaster Recover Data Center:

MySQL  mysql-dc2-1:33060+ ssl  JS > cluster.status()
 {
     "clusterName": "clusterDC2", 
     "defaultReplicaSet": {
         "name": "default", 
         "primary": "mysql-dc2-1:3306", 
         "ssl": "REQUIRED", 
         "status": "OK", 
         "statusText": "Cluster is ONLINE and can tolerate up to ONE failure.", 
         "topology": {
             "mysql-dc2-1:3306": {
                 "address": "mysql-dc2-1:3306", 
                 "mode": "R/W", 
                 "readReplicas": {}, 
                 "replicationLag": null, 
                 "role": "HA", 
                 "status": "ONLINE", 
                 "version": "8.0.18"
             }, 
             "mysql-dc2-2:3306": {
                 "address": "mysql-dc2-2:3306", 
                 "mode": "R/O", 
                 "readReplicas": {}, 
                 "replicationLag": null, 
                 "role": "HA", 
                 "status": "ONLINE", 
                 "version": "8.0.18"
             }, 
             "mysql-dc2-3:3306": {
                 "address": "mysql-dc2-3:3306", 
                 "mode": "R/O", 
                 "readReplicas": {}, 
                 "replicationLag": null, 
                 "role": "HA", 
                 "status": "ONLINE", 
                 "version": "8.0.18"
             }
         }, 
         "topologyMode": "Single-Primary"
     }, 
     "groupInformationSourceMember": "mysql-dc2-1:3306"
 }

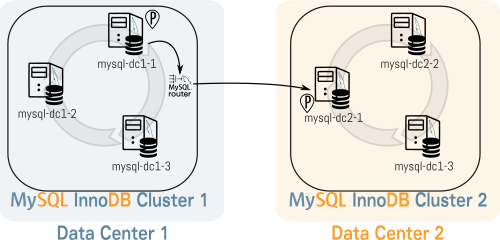
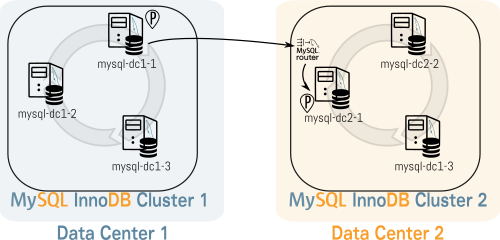
Now, before creating the asynchronous link, we have to bootstrap the MySQL Router.

We have two options, we can setup the router that connect on DC1 in DC2 or let it in DC1. This is an illustration
of both options:

Option 1
Option 2

I have chosen option 2. On mysql-dc2-1, the Primary-Master of DC2, I bootstrap the router that connects on DC1:

[root@mysql-dc2-1 ~]# mysqlrouter --bootstrap clusteradmin@mysql-dc1-1 \
                      --user=mysqlrouter --conf-use-gr-notifications
 Please enter MySQL password for clusteradmin: 
 Bootstrapping system MySQL Router instance…
 Checking for old Router accounts
 No prior Router accounts found
 Creating mysql account 'mysql_router1_abv0q7dfatf6'@'%' for cluster management
 Storing account in keyring
 Adjusting permissions of generated files
 Creating configuration /etc/mysqlrouter/mysqlrouter.conf 
 MySQL Router configured for the InnoDB cluster 'clusterDC1'
 After this MySQL Router has been started with the generated configuration
 $ /etc/init.d/mysqlrouter restart
 or
     $ systemctl start mysqlrouter
 or
     $ mysqlrouter -c /etc/mysqlrouter/mysqlrouter.conf
 the cluster 'clusterDC1' can be reached by connecting to:
 MySQL Classic protocol
 Read/Write Connections: localhost:6446
 Read/Only Connections:  localhost:6447 
 MySQL X protocol
 Read/Write Connections: localhost:64460
 Read/Only Connections:  localhost:64470 

And we start MySQL Router:

[root@mysql-dc2-1 ~]# systemctl start mysqlrouter

Now we can setup the asynchronous link between DC1 and DC2 where DC2 is the replica of DC1.

This asynchronous replication link will use a dedicated channel and filter out the metadata of the cluster:

SQL> CHANGE MASTER TO MASTER_HOST='localhost', MASTER_PORT=6446,
     MASTER_USER='repl', MASTER_PASSWORD='password',
     MASTER_AUTO_POSITION=1, MASTER_SSL=1, GET_MASTER_PUBLIC_KEY=1  
     FOR CHANNEL 'repl_from_dc1';

SQL> CHANGE REPLICATION FILTER REPLICATE_IGNORE_DB=(mysql_innodb_cluster_metadata) 
     FOR CHANNEL 'repl_from_dc1';

SQL> START SLAVE FOR CHANNEL 'repl_from_dc1';

And we can verify it:

MySQL  mysql-dc2-1:33060+ ssl  SQL > show slave status for channel 'repl_from_dc1'\G
 * 1. row *
                Slave_IO_State: Waiting for master to send event
                   Master_Host: localhost
                   Master_User: repl
                   Master_Port: 6446
                 Connect_Retry: 60
               Master_Log_File: binlog.000003
           Read_Master_Log_Pos: 26261
                Relay_Log_File: mysql-dc2-1-relay-bin-repl_from_dc1.000002
                 Relay_Log_Pos: 2107
         Relay_Master_Log_File: binlog.000003
              Slave_IO_Running: Yes
             Slave_SQL_Running: Yes
               Replicate_Do_DB: 
           Replicate_Ignore_DB: mysql_innodb_cluster_metadata
            Replicate_Do_Table: 
        Replicate_Ignore_Table: 
       Replicate_Wild_Do_Table: 
   Replicate_Wild_Ignore_Table: 
                    Last_Errno: 0
                    Last_Error: 
                  Skip_Counter: 0
           Exec_Master_Log_Pos: 26261
               Relay_Log_Space: 2327
               Until_Condition: None
                Until_Log_File: 
                 Until_Log_Pos: 0
            Master_SSL_Allowed: Yes
            Master_SSL_CA_File: 
            Master_SSL_CA_Path: 
               Master_SSL_Cert: 
             Master_SSL_Cipher: 
                Master_SSL_Key: 
         Seconds_Behind_Master: 0
 Master_SSL_Verify_Server_Cert: No
                 Last_IO_Errno: 0
                 Last_IO_Error: 
                Last_SQL_Errno: 0
                Last_SQL_Error: 
   Replicate_Ignore_Server_Ids: 
              Master_Server_Id: 3939750055
                   Master_UUID: b06dff8e-f9b1-11e9-8c43-080027b4d0f3
              Master_Info_File: mysql.slave_master_info
                     SQL_Delay: 0
           SQL_Remaining_Delay: NULL
       Slave_SQL_Running_State: Slave has read all relay log; waiting for more updates
            Master_Retry_Count: 86400
                   Master_Bind: 
       Last_IO_Error_Timestamp: 
      Last_SQL_Error_Timestamp: 
                Master_SSL_Crl: 
            Master_SSL_Crlpath: 
            Retrieved_Gtid_Set: 5765e9ea-f9b4-11e9-9f0e-080027b4d0f3:39-43
             Executed_Gtid_Set: 5765e9ea-f9b4-11e9-9f0e-080027b4d0f3:1-43,
 ae94a19d-f9b8-11e9-aaf5-080027b4d0f3:1-36
                 Auto_Position: 1
          Replicate_Rewrite_DB: 
                  Channel_Name: repl_from_dc1
            Master_TLS_Version: 
        Master_public_key_path: 
         Get_master_public_key: 1
             Network_Namespace: 

Now if the Primary-Master in DC1 changes, the asynchronous replication link will still work and DC2 as it uses the MySQL Router to point the the new Primary-Master. However is the Primary Master on DC2 dies, you will have to manually configure and start asynchronous replication on the new Master. Such operation can be performed automatically but you need to use an external tool as explained in this post.

You can already bootstrap and start MySQL Router on DC1 and setup asynchronous replication but I would recommend to not start it and use it only if DC2 gets the writes in case of disaster.

Using MySQL Community Repository with OL 8/RHEL 8/CentOS 8

$
0
0

MySQL 8.0 is now part of RedHat Enterprise 8 and other distros based on it like CentOS and Oracle Linux.. This is a very good thing !

However if for any reason you want to use the latest version of MySQL from the Community Repository, you may encounter some frustration if you are not familiar with the new way the package manager works.

Let’s start by verifying our system:

LSB Version:    :core-4.1-amd64:core-4.1-noarch
Distributor ID:    OracleServer
Description:    Oracle Linux Server release 8.0
Release:    8.0
Codename:    n/a

We can see that we are on Oracle Linux 8.0. So now let’s try to install MySQL Server:

[root@localhost ~]# dnf install mysql-server
Last metadata expiration check: 0:08:15 ago on Sat 02 Nov 2019 09:54:07 AM UTC.
Dependencies resolved.
============================================================================================
  Package                 Arch   Version                                Repository      Size
============================================================================================
Installing:
  mysql-server            x86_64 8.0.17-3.module+el8.0.0+5253+1dce7bb2  ol8_appstream  22 M
Installing dependencies:
  mysql-errmsg            x86_64 8.0.17-3.module+el8.0.0+5253+1dce7bb2  ol8_appstream  557 k
  mysql-common            x86_64 8.0.17-3.module+el8.0.0+5253+1dce7bb2  ol8_appstream  143 k
  protobuf-lite           x86_64 3.5.0-7.el8                            ol8_appstream  150 k
  mysql                   x86_64 8.0.17-3.module+el8.0.0+5253+1dce7bb2  ol8_appstream  11 M
  mariadb-connector-c-config
 …
Enabling module streams:
  mysql                          8.0                                                           
Transaction Summary
============================================================================================
Install  44 Packages
Total download size: 48 M
Installed size: 257 M

Note that in RedHat and CentOS, the repository is called AppStream

We can see that the package manager wants to install by default MySQL 8.0.17 ! Pretty recent, good !

We can also see that there is a module stream called mysql that is used. Let’s take a look at it:

[root@localhost ~]# dnf module list mysql
Last metadata expiration check: 0:00:53 ago on Sat 02 Nov 2019 10:17:51 AM UTC.
 Oracle Linux 8 Application Stream (x86_64)
 Name              Stream              Profiles                      Summary                
 mysql             8.0 [d]             client, server [d]            MySQL Module           
 Hint: [d]efault, [e]nabled, [x]disabled, [i]nstalled

The module is indeed enabled at set to default.

Now we will install our Community Repository from https://dev.mysql.com/downloads/repo/yum/:

[root@localhost ~]# rpm -ivh https://dev.mysql.com/get/mysql80-community-release-el8-1.noarch.rpm
Retrieving https://dev.mysql.com/get/mysql80-community-release-el8-1.noarch.rpm
warning: /var/tmp/rpm-tmp.hxFUWs: Header V3 DSA/SHA1 Signature, key ID 5072e1f5: NOKEY
Verifying…                          ################# [100%]
Preparing…                          ################# [100%]
Updating / installing…
    1:mysql80-community-release-el8-1  ################# [100%]

But if we try to install MySQL Community Server, the system one from AppStream is always selected. Whatever the package name used: mysql-server or mysql-community-server.

We need to disable the mysql module from the package manager:

[root@localhost ~]# dnf module disable mysql
Last metadata expiration check: 0:01:24 ago on Sat 02 Nov 2019 10:17:51 AM UTC.
Dependencies resolved.
===========================================================================================
 Package              Arch                Version               Repository            Size
===========================================================================================
Disabling module streams:
 mysql                                                                                    
Transaction Summary
===========================================================================================
Is this ok [y/N]: y
Complete!

And now it’s possible to install the lastest MySQL (8.0.18 at this moment):

[root@localhost ~]# dnf install mysql-server
Last metadata expiration check: 0:01:42 ago on Sat 02 Nov 2019 10:17:51 AM UTC.
Dependencies resolved.
===========================================================================================
 Package                    Arch       Version                 Repository             Size
===========================================================================================
Installing:
  mysql-community-server     x86_64     8.0.18-1.el8            mysql80-community      52 M
 Installing dependencies:
  mysql-community-client     x86_64     8.0.18-1.el8            mysql80-community      12 M
  mysql-community-common     x86_64     8.0.18-1.el8            mysql80-community     601 k
  mysql-community-libs       x86_64     8.0.18-1.el8            mysql80-community     1.4 M
  perl-constant              noarch     1.33-396.el8            ol8_baseos_latest      25 k
  …
  perl-parent                noarch     1:0.237-1.el8           ol8_baseos_latest      20 k
Transaction Summary
===========================================================================================
Install  36 Packages
Total download size: 77 M
Installed size: 394 M
Is this ok [y/N]: 

Note that you can now also use mysql-community-server as package name.

We are very happy to see that MySQL 8.0 is now available with a very updated version by default in these major distribution. And now you also know how to enable the MySQL repository if you want to use it too.

MySQL: Check who’s trying to access data they should not

$
0
0

To illustrate how easy it’s to see who’s trying to access data they have not been granted for, we will first create a schema with two tables:

mysql> create database mydata;
mysql> use mydata
mysql> create table table1 (id int auto_increment primary key, 
              name varchar(20), something varchar(20));
mysql> create table table2 (id int auto_increment primary key, 
              name varchar(20), something varchar(20));

Now, let’s create a user :

mysql> create user myuser identified by 'mypassword';

And as it’s always good to talk about SQL ROLES, let’s define 3 roles for our user:

  • myrole1: user has access to both tables in their entirety, reads and writes
  • myrole2: user has access only to `table2`, reads and writes
  • myrole3: user has only access to the column `name`of `table1` and just for reads
mysql> create role myrole1;
mysql> grant select, insert, update on mydata.* to myrole1;

mysql> create role myrole2;
mysql> grant select, insert, update on mydata.table2 to myrole2;

mysql> create role myrole3;
mysql> grant select(name) on mydata.table1 to myrole3;

Now let’s try to connect using our new user that doesn’t have any roles assigned yet:

$ mysqlsh myuser@localhost
Please provide the password for 'myuser@localhost': *****
MySQL   localhost:33060+   SQL  

Perfect we are connected, can we see the schema and use it ?

 MySQL   localhost:33060+   SQL  show databases;
+--------------------+
| Database           |
+--------------------+
| information_schema |
+--------------------+
1 row in set (0.0018 sec)
 MySQL   localhost:33060+   SQL  use mydata
MySQL Error ERROR 1044: Access denied for user 'myuser'@'%' to database 'mydata

So far, so good. Let’s assigned the first role to our user:

mysql> grant myrole1 to myuser;

Now the user can use the role:

 MySQL   localhost:33060+   SQL  set role 'myrole1';
Query OK, 0 rows affected (0.0007 sec)
 MySQL   localhost:33060+   SQL  show databases;
+--------------------+
| Database           |
+--------------------+
| information_schema |
| mydata             |
+--------------------+

Now I will add some data in both tables:

SQL> insert into table1 values (0, 'fred', 'aaa'), 
                               (0, 'kenny', 'bbb');
SQL> insert into table2 values (0, 'dave', 'ccc'), 
                               (0, 'miguel', 'ddd');

Of course the user can select and see everything:

MySQL   localhost:33060+    mydata  SQL  select * from table1;
+----+-------+-----------+
| id | name  | something |
+----+-------+-----------+
|  1 | fred  | aaa       |
|  2 | kenny | bbb       |
+----+-------+-----------+
2 rows in set (0.0011 sec)
 MySQL   localhost:33060+    mydata  SQL  select * from table2;
+----+--------+-----------+
| id | name   | something |
+----+--------+-----------+
|  1 | dave   | ccc       |
|  2 | miguel | ddd       |
+----+--------+-----------+
2 rows in set (0.0010 sec)

If you remember it, before we assigned any role to our user, we tried to use the schema and it failed. Let’s see if as the DBA having access to performance_schema we can see it:

mysql> select * from performance_schema.events_errors_summary_by_user_by_error 
where sum_error_raised>=1  and user='myuser' 
and ERROR_NAME like '%DENIED%' order by LAST_SEEN desc\G
******************* 1. row *******************
              USER: myuser
      ERROR_NUMBER: 1044
        ERROR_NAME: ER_DBACCESS_DENIED_ERROR
         SQL_STATE: 42000
  SUM_ERROR_RAISED: 1
 SUM_ERROR_HANDLED: 0
        FIRST_SEEN: 2019-11-15 03:25:17
         LAST_SEEN: 2019-11-15 03:25:17

Now let’ s change the role for the user, for example the most restrictive one and do some operations, but before that, we need to grant all remaining roles to our user:

mysql> grant myrole2, myrole3 to myuser;
 MySQL   localhost:33060+    mydata  SQL  set role 'myrole3';
Query OK, 0 rows affected (0.0008 sec)
 MySQL   localhost:33060+    mydata  SQL  select current_role();
+----------------+
| current_role() |
+----------------+
| myrole3@%    |
+----------------+
1 row in set (0.0008 sec)

And now let’s do some queries…

 MySQL   localhost:33060+    mydata  SQL  select * from table1;
ERROR: 1143: SELECT command denied to user 'myuser'@'localhost' 
for column 'id' in table 'table1'
 MySQL   localhost:33060+    mydata  SQL  select * from table2;
ERROR: 1142: SELECT command denied to user 'myuser'@'localhost' for table 'table2'
 MySQL   localhost:33060+    mydata  SQL  select name from table1;
+-------+
| name  |
+-------+
| fred  |
| kenny |
+-------+
2 rows in set (0.0010 sec)

And running the same query as above, we can now very all those access attempts that were not granted:

 mysql> select * from performance_schema.events_errors_summary_by_user_by_error 
where sum_error_raised>=1  and user='myuser' 
and ERROR_NAME like '%DENIED%' order by LAST_SEEN desc\G
 ******************* 1. row *******************
              USER: myuser
      ERROR_NUMBER: 1142
        ERROR_NAME: ER_TABLEACCESS_DENIED_ERROR
         SQL_STATE: 42000
  SUM_ERROR_RAISED: 1
 SUM_ERROR_HANDLED: 0
        FIRST_SEEN: 2019-11-15 03:40:50
         LAST_SEEN: 2019-11-15 03:41:43
 ******************* 2. row *******************
              USER: myuser
      ERROR_NUMBER: 1143
        ERROR_NAME: ER_COLUMNACCESS_DENIED_ERROR
         SQL_STATE: 42000
  SUM_ERROR_RAISED: 1
 SUM_ERROR_HANDLED: 0
        FIRST_SEEN: 2019-11-15 03:41:38
         LAST_SEEN: 2019-11-15 03:41:38
 ******************* 3. row *******************
              USER: myuser
      ERROR_NUMBER: 1044
        ERROR_NAME: ER_DBACCESS_DENIED_ERROR
         SQL_STATE: 42000
  SUM_ERROR_RAISED: 1
 SUM_ERROR_HANDLED: 0
        FIRST_SEEN: 2019-11-15 03:25:17
         LAST_SEEN: 2019-11-15 03:25:17

In summary, it’s very easy to very who’s trying to access unauthorized data and when it happened.

And don’t forget, it’s time to upgrade to MySQL 8 ! #MySQL8isGreat 😉

Related links to SQL ROLES:

  • https://lefred.be/content/how-to-grant-privileges-to-users-in-mysql-8-0/
  • https://lefred.be/content/some-queries-related-to-mysql-roles/
  • https://lefred.be/content/mysql-8-0-roles-and-graphml/

Credits for the icons:

  • Security Camera by Anton Barbarov from the Noun Project
  • computer access control by monkik from the Noun Project

MySQL Shell Plugins: audit

$
0
0

As you may know, it’s now possible to create your own plugins for MySQL Shell. See the following posts:

I’ve created several plugins that you can find on github. My colleague Bernt already contributed too.

You are more than welcome to comment, fill bugs, feature requests and pull requests of course !

I want to start a series of article covering those plugins. Their goal and how to use them.

Audit Plugin

I will start today with the audit one and particularly the methods/functions related to the binary logs.

Let’s first see the help of that plugin:

getBinlogs()

Let’s see an example of the execution of that method:

So on my server we can see that currently we have 9 binlog files available.

getBinlogsIO()

This method prints the IO statistics of binary logs files available on the server:

Let’s run show binlog events in 'binlog.000052'; and see the new output:

showTrxSize() and showTrxSizeSort()

And finally, let’s verify the size of transactions in the binary logs. We have two methods, one showing the transactions from the end to the start of the last binary log or the one provided as argument. The other one sort them by size descending and limit it to 10 by default:

Let’s see the last one in action:

This is a good way to see if your don’t have transaction size bigger than group_replication_transaction_size_limit when you want to migrate to MySQL InnoDB Cluster.

In the next post, I will cover the remaining methods of the audit plugin.

Viewing all 411 articles
Browse latest View live